Moonrakerの電源管理で任意のスマートプラグを使う(Tplink P105)
About
KlipperのAPIであるMoonrakerには電源管理機能があるが,
- 対応するスマートプラグの種類が少ない
- サーボなどでスイッチを動かそうとした場合,PWMを出力するオプションがない
- 任意のGCodeを指定してgcode_shell_commandでシェルスクリプトを起動することができるが,これはプリンタ側のマイコンとの通信が確立している必要があるため 電源ON時に使うことができない
という欠点がある.自分は今までサーボで電源をON/OFFしており,その後TP-Link P105というスマートプラグに乗り換えたという経緯があり,今回はこれを解決した方法を説明する.

TP-Link P105 - Amazon
https://www.amazon.co.jp/dp/B08G1G1DVT
やりたいこと
Moonrakerには電源管理でHTTPリクエストを飛ばす機能があり,Pythonでそれを受けるローカルサーバを立てることで任意の処理を実行可能にする.このやり方では別途Homebridgeのインスタンスを立てる必要などもないためシンプルかつ軽量に実装できる.
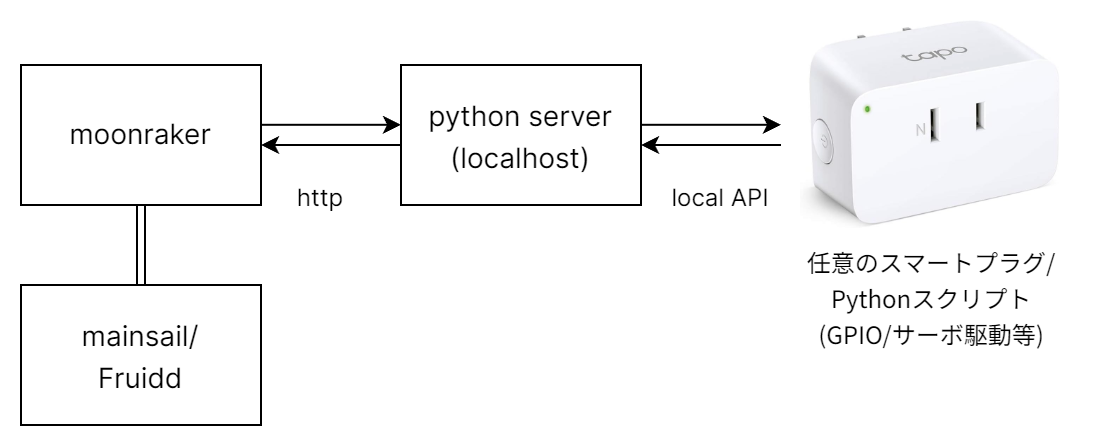
ここではTPLink P105を例として説明するが,他の方法を取る場合でも流れは同じである(適宜コードを読み替えてほしい)
※任意のと言ったがPython経由で操作できるスマートプラグである必要がある
Pythonでサーバ部分を書く
適当なディレクトリにpythonコードを作成する.
1
2
3
| mkdir ~/src
cd ~/src
touch power.py
|
内容を
 1
 2
 3
 4
 5
 6
 7
 8
 9
10
11
12
13
14
15
16
17
18
19
20
21
22
23
24
25
26
27
28
29
30
31
32
33
34
35
36
37
38
39
40
41
42
43
44
45
46
47
48
49
50
51
52
53
54
55
56
57
58
59
60
61
62
63
64
65
66
| from http.server import BaseHTTPRequestHandler, HTTPServer
import asyncio
import os
from tapo import ApiClient
IP = "TapoのIP"
USER = "Tapoのユーザ名"
PASS = "Tapoのパスワード"
class Tapo:
def __init__(self, ip_address, username, password):
self.ip_address = ip_address
self.username = username
self.password = password
async def conncet(self):
self.client = ApiClient(self.username, self.password)
self.device = await self.client.p105(self.ip_address)
async def on(self):
await self.device.on()
async def off(self):
await self.device.off()
async def status(self):
device_info = await self.device.get_device_info()
if device_info.to_dict()['device_on']:
return 'on'
else:
return 'off'
tapo = Tapo(IP, USER, PASS)
class SimpleHTTPRequestHandler(BaseHTTPRequestHandler):
def do_GET(self):
self.send_response(200)
self.send_header('Content-type', 'text/plain')
self.end_headers()
asyncio.run(tapo.conncet())
message = ''
# 別のスマートプラグを使う場合やPWMを使う場合はここから下を適宜書き換える
if self.path == '/on':
asyncio.run(tapo.on())
message = "on\n"
elif self.path == '/off':
asyncio.run(tapo.off())
message = "off\n"
elif self.path == '/status':
message = asyncio.run(tapo.status())
self.wfile.write(message.encode())
def run(server_class=HTTPServer, handler_class=SimpleHTTPRequestHandler, port=8000):
server_address = ('', port)
httpd = server_class(server_address, handler_class)
print(f"Server running on port {port}")
httpd.serve_forever()
if __name__ == "__main__":
run()
|
依存関係(今回はこのライブラリを使う)をインストールして
実行する
1
2
| sudo cdmod +x ~/src/power.py
sudo python ~/src/power.py
|
出力が
1
| Server running on port 8000
|
となれば実行はできている.
1
2
3
4
5
| sudo apt install curl
curl http://localhost:8000/on
curl http://localhost:8000/status
curl http://localhost:8000/off
curl http://localhost:8000/status
|
を1行ずつ実行し,うまく実行されればスクリプトの作成は成功である.
OS起動時に自動実行されるようにする
起動用シェルスクリプトの作成
1
2
| touch ~/src/power.sh
nano ~/src/power.sh
|
内容を
1
2
| #!/usr/bin/env bash
python ~/src/power.py
|
として保存.
1
2
| chmod +x ~/src/power.sh
~/src/power.sh
|
実行して起動するかを確認する.
Serviceを作成
1
2
| sudo touch /etc/systemd/system/power/service
sudo nano /etc/systemd/system/power/service
|
として内容を
1
2
3
4
5
6
7
8
| [Unit]
Description=power
[Service]
ExecStart=/home/[username]/src/power.sh
[Install]
WantedBy=default.target
|
とする.usernameは各自の環境で置き換えてほ欲しい.
1
| systemctl status power.service
|
として
1
2
3
| ○ manager.service - power
Loaded: loaded (/etc/systemd/system/power.service; disabled; vendor preset: enabled)
Active: inactive (dead)
|
となればよい.
1
| sudo systemctl enable power.service
|
として
その後
1
| systemctl status power.service
|
として
1
2
3
| ● power.service - power
Loaded: loaded (/etc/systemd/system/power.service; enabled; vendor preset: enabled)
Active: active (running) since Wed 2024-01-24 09:19:02 UTC; 47s ago
|
といった出力が得られれば成功である.
ここで試しに
1
2
3
4
| curl http://localhost:8000/on
curl http://localhost:8000/status
curl http://localhost:8000/off
curl http://localhost:8000/status
|
を実行して動作を確認する.
Moonrakerの設定
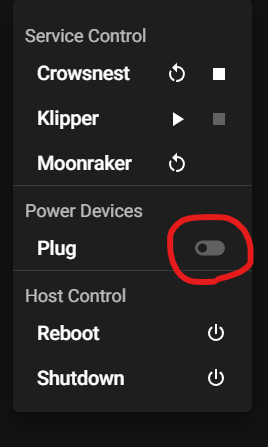
ブラウザでMainsailの画面を開き,moonraker.confに以下の内容を追記する.
 1
 2
 3
 4
 5
 6
 7
 8
 9
10
11
12
13
14
| [power Plug]
type: http
on_url: http://localhost:8000/on
off_url: http://localhost:8000/off
status_url: http://localhost:8000/status
response_template: {http_request.last_response().text}
bound_services: klipper
on_when_job_queued: True
[file_manager]
queue_gcode_uploads: True
[job_queue]
load_on_startup: True
|
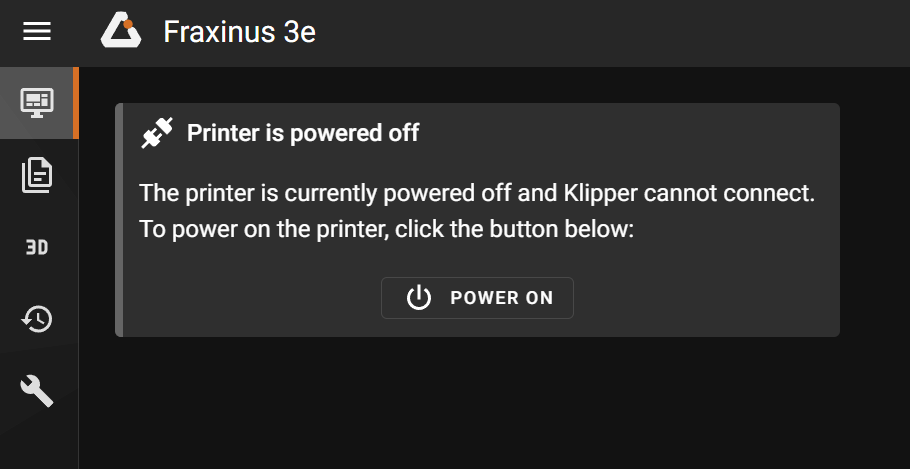
Save and Restartして,右上の電源ボタンから電源をオンオフできれば完了.
スライサーからアップロードすると電源が自動的に入り印刷が開始されるようになる.
参考文献